GitLab Dedicated network access and security
- Tier: Ultimate
- Offering: GitLab Dedicated
Use these settings to control how your GitLab Dedicated instance connects to the internet and to your private infrastructure. You can configure custom domains, manage certificate authorities for external services, set up private network connectivity with AWS PrivateLink, restrict access with an IP allowlist, and view the outbound IPs your instance uses.
Custom domains
You can configure a custom domain to access your GitLab Dedicated
instance instead of the default your-tenant.gitlab-dedicated.com.
When you add a custom domain:
- The domain is included in the external URL used to access your instance.
- Any connections to your instance using the default
tenant.gitlab-dedicated.comdomain are no longer available.
GitLab automatically manages SSL/TLS certificates for your custom domain using Let’s Encrypt. Let’s Encrypt uses the HTTP-01 challenge to verify domain ownership, which requires:
- The CNAME record to be publicly resolvable through DNS.
- The same public validation process for automatic certificate renewal every 90 days.
For instances configured with private networking (such as AWS PrivateLink), public DNS resolution ensures certificate management works properly, even when all other access is restricted to private networks.
GitLab Dedicated supports custom domains through two configuration methods:
- Standard configuration: Uses CNAME records and Let’s Encrypt certificates. You configure your own DNS records and request domain activation through support.
- Cloudflare security configuration: Uses NS records and Let’s Encrypt certificates. GitLab provides DNS configuration details and you implement them in coordination with support.
Contact your Customer Success Manager to determine which configuration method applies to your instance.
View your custom domain details
The Custom domains section displays the active domain configuration for your GitLab Dedicated instance, including:
- GitLab instance domain: The custom domain for your GitLab instance.
- Registry domain: The custom domain for the container registry.
- KAS domain: The custom domain for the GitLab agent server for Kubernetes (KAS).
Use this information to:
- Verify your current custom domain configuration.
- Reference domains for external integrations.
- Copy configuration details for DNS management.
To view your custom domain details:
- Sign in to Switchboard.
- Select the Configuration tab.
- Expand Custom domains.
DNSSEC details
- Tier: Ultimate
- Offering: GitLab Dedicated for Government
If your custom domain is configured with Cloudflare Web Application Firewall (WAF), Switchboard displays additional configuration details, including Cloudflare nameservers and DNSSEC parameters for FedRAMP compliance.
The additional details include:
- Cloudflare nameservers: DNS nameservers for Cloudflare-managed domains.
- Key tag: Numeric identifier for the DNSSEC key.
- Algorithm: Cryptographic algorithm used (typically 13 for ECDSA P-256 with SHA-256).
- Digest type: Hash algorithm used (typically 2 for SHA-256).
- Digest: Cryptographic hash of the public key.
Use these values to configure DNS delegation and DNSSEC validation with your DNS provider.
Standard configuration
With this configuration, your domain connects directly to your GitLab instance using a CNAME record. You configure your own DNS records and request domain activation through support.
Your custom domain must be accessible from the public internet for SSL certificate management, even if you access your instance through private networks.
Configure DNS records
Prerequisites:
- Access to your domain host’s DNS settings.
To configure DNS records:
Sign in to your domain host’s website.
Go to the DNS settings.
Add a
CNAMErecord that points your custom domain to your GitLab Dedicated instance. For example:gitlab.my-company.com. CNAME my-tenant.gitlab-dedicated.comOptional. If your domain has an existing
CAArecord, update it to include Let’s Encrypt as a valid certificate authority. For example:gitlab.my-company.com. IN CAA 0 issue "pki.goog" gitlab.my-company.com. IN CAA 0 issue "letsencrypt.org"The
CAArecord defines which certificate authorities can issue certificates for your domain.Save your changes and wait for DNS changes to take effect.
Keep your DNS records in place as long as you use the custom domain.
Enable a custom domain
Prerequisites:
- You have configured the DNS records.
To enable your custom domain:
- Submit a support ticket.
- In your support ticket, specify:
- Your custom domain name. For example,
gitlab.company.com. - If you need custom domains for the container registry and GitLab agent server for
Kubernetes, include the domain names you want to use. For example,
registry.company.comandkas.company.com.
- Your custom domain name. For example,
Cloudflare security configuration
With this configuration, your domain must be delegated to GitLab using NS records, which allows traffic to be routed through Cloudflare Web Application Firewall (WAF). Cloudflare manages all DNS settings for your domain and provides enhanced security features.
This approach requires coordination with your Customer Success Manager. The configuration is applied during your instance’s maintenance period.
Request a custom domain
To request a custom domain:
- Submit a support ticket.
- In your support ticket, specify:
- Your custom domain name. For example,
gitlab.company.com. - If you need custom domains for the container registry and GitLab agent server for
Kubernetes, include the domain names you want to use. For example,
registry.company.comandkas.company.com. - Your compliance requirements. For example, FedRAMP.
- Your custom domain name. For example,
GitLab configures your domain in Cloudflare and provides:
- Two Cloudflare nameservers, like
name1.ns.cloudflare.comandname2.ns.cloudflare.com. - DNSSEC parameters (FedRAMP customers only), including:
- Key tag: Numeric identifier (provided by GitLab)
- Algorithm: Typically 13 (ECDSA P-256 with SHA-256) or 8 (RSA/SHA-256)
- Digest type: Typically 2 (SHA-256)
- Digest: Cryptographic hash of the public key (provided by GitLab)
Configure DNS records
Configure NS records in your DNS provider to delegate your subdomain to Cloudflare.
Prerequisites:
- Access to your domain host’s DNS settings.
- GitLab has provided nameservers and DNSSEC parameters (if applicable).
To configure DNS records:
Sign in to your domain host’s website.
Go to the DNS settings.
Create NS records using the nameservers provided by GitLab. For example:
gitlab.company.com.     NS    name1.ns.cloudflare.com.
gitlab.company.com.     NS    name2.ns.cloudflare.com.
Remove any conflicting A, AAAA, or CNAME records for the same subdomain.
FedRAMP customers only. Add a DS record using the values provided by GitLab:
gitlab.company.com. DS [Key Tag] [Algorithm] [Digest Type] [Digest]For example:
gitlab.company.com. DS 12345 13 2 A1B2C3D4E5F6...Save your changes. DNS changes can take up to 48 hours to take effect.
Verify your configuration:
# Verify nameserver delegation
dig +short NS gitlab.company.com

# Verify DNS resolution
dig gitlab.company.com

# Verify DNSSEC (if configured)
dig +dnssec gitlab.company.com
Notify GitLab through your support ticket that DNS configuration is complete.
GitLab then:
- Verifies DNS delegation.
- Configures SSL/TLS certificates.
- Confirms when your custom domain is active.
Container registry network access
The container registry FQDN (Fully Qualified Domain Name) identifies the S3 bucket that stores your instance’s container registry data.
View your container registry FQDN
Use the FQDN instead of IP addresses to configure firewall rules and network policies that reference the registry storage location. IP addresses for S3 buckets can change over time.
To view your container registry FQDN:
- Sign in to Switchboard.
- Select the Configuration tab.
- Expand Resource access.
- Under Container registry, select Copy to clipboard ( ).
Custom certificate authorities for external services
GitLab Dedicated validates certificates when connecting to external services over HTTPS. By default, GitLab Dedicated trusts only publicly recognized certificate authorities and rejects connections to services with certificates from untrusted certificate authorities.
If your external services use certificates from a private or internal certificate authority, you must add that certificate authority to your GitLab Dedicated instance.
You might need custom certificate authorities to:
- Connect to internal webhook endpoints.
- Pull images from private container registries.
- Integrate with on-premises services behind corporate public key infrastructure.
Add a custom certificate
Certificate chain blocks (multiple certificates in a single text block) are not supported. If you have multiple certificates in your chain, add each certificate separately.
To add a custom certificate:
- Sign in to Switchboard.
- At the top of the page, select Configuration.
- Expand Custom certificate authorities.
- Select + Add Certificate.
- Paste a single certificate into the text box. Include the
-----BEGIN CERTIFICATE-----and-----END CERTIFICATE-----lines. - Select Save.
- Repeat steps 4-6 for each additional certificate in your chain.
- Scroll up to the top of the page and select whether to apply the changes immediately or during the next maintenance window.
If you cannot use Switchboard to add a custom certificate, open a support ticket and attach each custom certificate as a separate file.
AWS PrivateLink connectivity
AWS PrivateLink enables private network connectivity between your AWS infrastructure and your GitLab Dedicated instance without routing traffic over the public internet. All traffic stays within the AWS network, which reduces exposure to external threats and can help meet compliance requirements for private networking.
GitLab Dedicated supports two types of PrivateLink connections:
- Inbound PrivateLink connections: Users and applications in your VPC connect privately to your GitLab Dedicated instance. Use this when you want to restrict access so your instance is not reachable over the public internet.
- Outbound PrivateLink connections: Your GitLab Dedicated instance and hosted runners connect privately to services running in your VPC. Use this for webhooks, project mirroring, secrets managers, or deployments into your infrastructure.
PrivateLink connections must be in the same AWS region as your GitLab Dedicated instance, and you can create endpoint services only in your primary and secondary AWS regions.
For more information about AWS PrivateLink, see what is AWS PrivateLink?.
Inbound PrivateLink connections
Inbound PrivateLink connections allow users and applications in your VPC to connect privately to your GitLab Dedicated instance.
When you create an endpoint service, you specify IAM principals that control access. Only the IAM principals you specify can create VPC endpoints to connect to your instance.
Each endpoint service is available in two availability zones, chosen during onboarding or randomly selected.
IAM principals are configured independently for each region. You can reuse the same principals across regions, or use different ones if your secondary region uses a separate AWS account.
Create an inbound PrivateLink connection
Create an inbound PrivateLink connection to allow users and applications in your VPC to connect privately to your GitLab Dedicated instance.
To keep this connection available during regional failover, configure a secondary region endpoint. Without this, your instance is not privately accessible if your primary region becomes unavailable.
Prerequisites:
- A VPC in each region you want to configure.
- An IAM principal with permissions to discover the GitLab-provided endpoint service, create the interface VPC endpoint, and associate it with the Route 53 private hosted zone when private DNS is enabled.
- IAM principals with role names only, without role paths.
- Valid:
arn:aws:iam::AWS_ACCOUNT_ID:role/RoleName - Invalid:
arn:aws:iam::AWS_ACCOUNT_ID:role/somepath/AnotherRoleName
- Valid:
To create an inbound PrivateLink connection:
Sign in to Switchboard.
At the top of the page, select Configuration.
Expand Inbound PrivateLink connections.
Select Add endpoint service.
Select a region.
Under IAM principals, add the AWS users or roles that can initiate connections to the endpoint service. The IAM principals must be IAM role principals or IAM user principals.
In your AWS account, attach a policy with the following permissions to the role or user that creates the VPC endpoint:
{
  "Version": "2012-10-17",
  "Statement": [
    {
      "Sid": "GitLabDedicatedInboundPrivateLink",
      "Effect": "Allow",
      "Action": [
        "ec2:CreateVpcEndpoint",
        "ec2:DescribeVpcEndpointServices",
        "ec2:DescribeVpcEndpoints",
        "ec2:DescribeVpcs",
        "route53:AssociateVPCWithHostedZone"
      ],
      "Resource": "*"
    }
  ]
}
Recommended. To configure a secondary region, select Secondary region under Regions. This will create endpoint services in the both regions with the specified IAM principals.
Select Save. GitLab creates the endpoint services and the service endpoint names become available on the Configuration page.
Then, for each region you configured, complete the AWS setup:
- In your AWS account, create an endpoint interface in your VPC.
- Configure the endpoint interface with these settings:
- Service endpoint name: Use the name for that region from the Configuration page in Switchboard.
- Private DNS names enabled: Select Yes.
- Subnets: Select all matching subnets.
- Use the instance URL provided during onboarding to connect to your GitLab Dedicated instance from your VPC.
To automate the AWS VPC endpoint setup, you can use the
terraform-inbound-privatelink
Terraform module. The module also outputs the Route 53 records required when you switch DNS.
Configure DNS for KAS and registry
Create additional DNS configuration in your VPC to access KAS (GitLab agent for Kubernetes) and the container registry through your private network.
Prerequisites:
- You have configured inbound PrivateLink connections.
- You have permission to create Route 53 private hosted zones in your AWS account.
To configure DNS for KAS and registry:
In your AWS console, create a private hosted zone for
gitlab-dedicated.comand associate it with the VPC that contains your inbound PrivateLink connection.After you create the private hosted zone, add the following DNS records (replace
examplewith your instance name):Create an
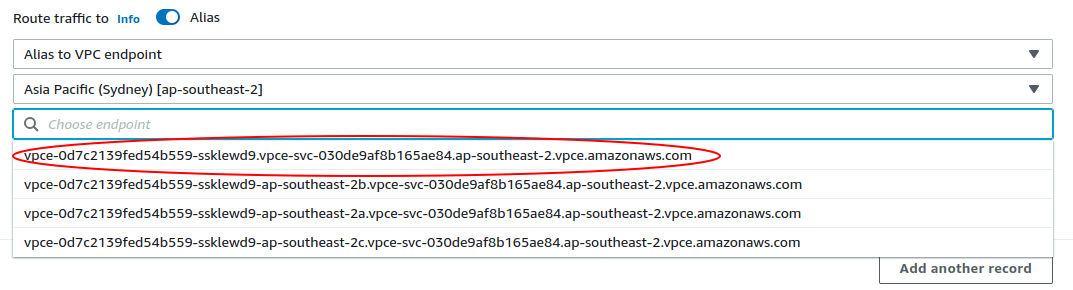
Arecord for your GitLab Dedicated instance:Configure your full instance domain (for example,
example.gitlab-dedicated.com) to resolve to your VPC endpoint as an alias.Select the VPC endpoint that does not contain an availability zone reference.
Create
CNAMErecords for both KAS and the registry to resolve to your GitLab Dedicated instance domain (example.gitlab-dedicated.com):kas.example.gitlab-dedicated.comregistry.example.gitlab-dedicated.com
To verify connectivity, from a resource in your VPC, run these commands:
nslookup kas.example.gitlab-dedicated.com
nslookup registry.example.gitlab-dedicated.com
nslookup example.gitlab-dedicated.com
All commands should resolve to private IP addresses within your VPC.
This configuration uses the VPC endpoint interface rather than specific IP addresses, so it remains stable if IP addresses change.
Configure DNS for GitLab Pages
To access GitLab Pages through your private network, create additional DNS configuration in your VPC.
To configure DNS for GitLab Pages:
- In your AWS console, create a private hosted zone for
<tenant_name>.gitlab-dedicated.siteand associate it with the VPC that contains your inbound PrivateLink connection. - After you create the private hosted zone, add the following DNS records:
- Create an apex
Aalias record for the VPC endpoint. - Create a wildcard
CNAMEfor*.<tenant_name>.gitlab-dedicated.sitethat points to<tenant_name>.gitlab-dedicated.site.
- Create an apex
Outbound PrivateLink connections
Outbound PrivateLink connections allow your GitLab Dedicated instance and hosted runners to communicate privately with services running in your VPC, without exposing traffic to the public internet.
Use outbound PrivateLink connections to send webhooks, import or mirror projects and repositories, and give hosted runners access to custom secrets managers, artifacts, job images, and deployments in your infrastructure.
You can create up to 10 outbound PrivateLink connections for each region. To consolidate
more than 10 backend services behind a single connection, you can use the
terraform-outbound-proxy
Terraform module to deploy a highly available NGINX reverse proxy with TLS passthrough,
HTTP routing, and SMTP forwarding.
Outbound PrivateLink connections in Switchboard use service connections to manage connectivity. A service connection links a DNS alias to a VPC endpoint service in your AWS account. Each service connection can have up to two VPC endpoints, one for each region (primary and secondary). When you create a service connection, you choose how DNS is resolved:
- GitLab-managed DNS: GitLab creates a private hosted zone (PHZ) and DNS record for the alias alongside the VPC endpoint.
- Private DNS: AWS handles DNS resolution automatically using the private DNS name of your endpoint service. GitLab does not create DNS records in this case.
For aliases that do not require a VPC endpoint, you can create a custom DNS record instead.
Create a service connection
Create a service connection to route outbound traffic from your GitLab Dedicated instance through AWS PrivateLink to a service in your VPC.
To keep this connection available during regional failover, configure a secondary region endpoint. Without this, outbound connections are unavailable if your primary region becomes unavailable. Switchboard displays a warning if a service connection has VPC endpoints in only one region.
Prerequisites:
- An endpoint service created for your internal service, with the service name noted. For more information, see create an endpoint service.
- A Network Load Balancer (NLB) configured in the availability zones where your instance is deployed. Either use the configured AZs (displayed on the Overview page in Switchboard) or enable the NLB in every AZ in the region.
To create a service connection:
- Sign in to Switchboard.
- At the top of the page, select Configuration.
- Expand Outbound PrivateLink connections, then select Outbound PrivateLink connections.
- Expand Set up endpoint service in AWS and copy the ARN from Outbound PrivateLink IAM principal.
- In your AWS endpoint service, add the ARN to the Allowed Principals list. For more information, see manage permissions.
- Select the Service connections tab.
- Select Create service connection.
- Complete the fields:
- Alias: Enter the DNS name your GitLab Dedicated instance uses to reach the
service. For example,
my-service.example.com. - Optional. Description: Enter a description for this connection.
- Alias: Enter the DNS name your GitLab Dedicated instance uses to reach the
service. For example,
- Under the primary region, complete the fields:
- VPC endpoint: Select New VPC endpoint and enter the VPC endpoint service
name from your AWS account (for example,
com.amazonaws.vpce.us-east-1.vpce-svc-0a123bcd4e5f678gh), or select Existing VPC endpoint and choose an endpoint from the dropdown list. - Optional. Description: Enter a description for this region’s endpoint.
- DNS: Select GitLab-managed DNS to have GitLab maintain private hosted zone records, or Private DNS to use the private DNS name configured on your VPC endpoint service in AWS.
- VPC endpoint: Select New VPC endpoint and enter the VPC endpoint service
name from your AWS account (for example,
- Do one of the following for the secondary region:
- To add a VPC endpoint, complete the same fields as the primary region.
- To skip the secondary region, select Remove in the top right of the section.
- Select Save.
GitLab configures your instance to create the necessary VPC endpoints and DNS records (unless Private DNS is selected, in which case AWS manages DNS resolution). After setup, GitLab routes matching outbound connections into your VPC over PrivateLink.
Create a custom DNS record
Use custom DNS records for DNS aliases that do not point to a VPC endpoint. For example, use a custom DNS record when you need your GitLab Dedicated instance to resolve a private domain name to a publicly accessible or internally routed service.
By default, the alias splits at the first dot into a record name and private hosted zone
name. For example, service.example.com splits into record name service and zone
example.com. If this split causes domain shadowing or conflicts with existing service
connection aliases or custom domains, use the advanced option to customize the split.
A private hosted zone (PHZ) is a container that holds information about how Amazon Route 53 responds to DNS queries for a domain and its subdomains within your GitLab Dedicated VPC. For more information, see private hosted zones.
Changes to custom DNS records, or to service connections when using GitLab-managed DNS (private hosted zones), can disrupt services that use these records for up to five minutes.
To add a custom DNS record:
- Sign in to Switchboard.
- At the top of the page, select Configuration.
- Expand Outbound PrivateLink connections, then select Outbound PrivateLink connections.
- Select the Custom DNS records tab.
- Select Create DNS record.
- Complete the fields:
- Alias: Enter the DNS name your GitLab Dedicated instance uses to reach the
service. For example,
my-internal-service.example.com. - Optional. Description: Enter a description for this record.
- Optional. Select Customize DNS record and zone split (advanced) to control how the record name is split into a record name and private hosted zone. When selected, the Record name text box becomes read-only and is automatically composed from the Record name and Private hosted zone name values you enter.
- Alias: Enter the DNS name your GitLab Dedicated instance uses to reach the
service. For example,
- Under each region, enter the Target domain name the alias resolves to. To support failover, enter a target domain name for both your primary and secondary regions.
- Select Save.
- Scroll to the top of the page and select whether to apply the changes immediately or during the next maintenance window.
Configure outbound PrivateLink connections with a support request
If you cannot use Switchboard to configure outbound PrivateLink connections:
- Open a support ticket
and provide:
- The VPC endpoint service name.
- The DNS alias you want to use, if applicable.
- Whether Private DNS is enabled on your endpoint service.
- Copy the ARN of the IAM principal provided by GitLab and add it to the Allowed Principals list on your endpoint service. For more information, see manage permissions.
Delete an outbound PrivateLink connection
You can delete a service connection or a VPC endpoint independently. Each has its own tab in Switchboard: Service connections and VPC endpoints.
To delete a service connection:
- Sign in to Switchboard.
- At the top of the page, select Configuration.
- Expand Outbound PrivateLink connections.
- Select the Service connections tab.
- Go to the connection you want to delete, then select Delete ( ).
- Select Delete.
To delete a VPC endpoint:
- Sign in to Switchboard.
- At the top of the page, select Configuration.
- Expand Outbound PrivateLink connections.
- Select the VPC endpoints tab.
- Go to the endpoint you want to delete, then select Delete ( ).
- Select Delete.
IP allowlist
Control which IP addresses can access your instance with an IP allowlist.
When you enable the IP allowlist, IP addresses not on the allowlist are blocked
and receive an HTTP 403 Forbidden response when they try to access your instance.
Use Switchboard to configure and manage your IP allowlist, or submit a support request if Switchboard is unavailable.
Add IP addresses to the allowlist with Switchboard
To add IP addresses to the allowlist:
Sign in to Switchboard.
At the top of the page, select Configuration.
Expand IP allowlist, then select IP allowlist to go to the IP allowlist page.
To enable the IP allowlist, select the vertical ellipsis ( ), then select Enabled.
Do one of the following:
- To add a single IP address:
- Select Add IP address.
- In the IP address text box, enter either:
- A single IPv4 address (for example,
192.168.1.1). - An IPv4 address range in CIDR notation (for example,
192.168.1.0/24).
- A single IPv4 address (for example,
- In the Description text box, enter a description.
- Select Add.
- To import multiple IP addresses:
- Select Import.
- Upload a CSV file or paste a list of IP addresses.
- Select Continue.
- Fix any invalid or duplicate entries, then select Continue.
- Review the changes, then select Import.
At the top of the page, choose whether to apply the changes immediately or during the next maintenance window.
Delete IP addresses from the allowlist with Switchboard
To delete IP addresses from the allowlist:
Sign in to Switchboard.
At the top of the page, select Configuration.
Expand IP allowlist, then select IP allowlist to go to the IP allowlist page.
Do one of the following:
- To delete a single IP address:
- Next to the IP address you want to remove, select the trash icon ( ).
- Select Delete IP address.
- To delete multiple IP addresses:
- Select the checkboxes for the IP addresses you want to delete.
- To select all IP addresses on the current page, select the checkbox in the header row.
- Above the IP addresses table, select Delete.
- Select Delete to confirm.
At the top of the page, choose whether to apply the changes immediately or during the next maintenance window.
Add an IP to the allowlist with a support request
If you cannot use Switchboard to update your IP allowlist, open a support ticket and specify a comma-separated list of IP addresses that can access your instance.
Enable OpenID Connect for your IP allowlist
Using GitLab as an OpenID Connect identity provider requires internet access to the OpenID Connect verification endpoint.
To enable access to the OpenID Connect endpoint while maintaining your IP allowlist:
- In a support ticket, request to allow access to the OpenID Connect endpoint.
The configuration is applied during the next maintenance window.
Enable SCIM provisioning for your IP allowlist
You can use SCIM with external identity providers to automatically provision and manage users. To use SCIM, your identity provider must be able to access the instance SCIM API endpoints. By default, IP allowlisting blocks communication to these endpoints.
To enable SCIM while maintaining your IP allowlist:
- In a support ticket, request to enable SCIM endpoints to the internet.
The configuration is applied during the next maintenance window.
NAT gateway IP addresses
NAT gateway IP addresses identify your instance’s outbound connections to external services. They typically remain consistent but can change if a regional failover occurs, because the instance is rebuilt with new infrastructure.
Use these IP addresses to configure webhook receivers and set up allowlists for external services to accept connections from your instance.
To view your NAT gateway IP addresses:
- Sign in to Switchboard.
- Select the Configuration tab.
- Expand Resource access.
- Under NAT gateways, select Copy to clipboard ( ).
Troubleshooting AWS PrivateLink connectivity
When working with AWS PrivateLink connections, you might encounter the following issues.
Error: Service name could not be verified
When creating a VPC endpoint for an inbound PrivateLink connection,
you might get an error that states Service name could not be verified.
This issue occurs when the custom IAM role provided in the support ticket does not have the required permissions or trust policies configured in your AWS account.
To resolve this issue:
Confirm that you can assume the custom IAM role provided to GitLab in the support ticket.
Verify the custom role has a trust policy that allows you to assume it. For example:
{
    "Version": "2012-10-17",
    "Statement": [
        {
            "Sid": "Statement1",
            "Effect": "Allow",
            "Principal": {
                "AWS": "arn:aws:iam::CONSUMER_ACCOUNT_ID:user/user-name"
            },
            "Action": "sts:AssumeRole"
        }
    ]
}
Verify the custom role has a permission policy that allows VPC endpoint and EC2 actions. For example:
{
   "Version": "2012-10-17",
   "Statement": [
      {
         "Sid": "VisualEditor0",
         "Effect": "Allow",
         "Action": "vpce:*",
         "Resource": "*"
      },
      {
         "Sid": "Statement1",
         "Effect": "Allow",
         "Action": [
               "ec2:CreateVpcEndpoint",
               "ec2:DescribeVpcEndpointServices",
               "ec2:DescribeVpcEndpoints"
         ],
         "Resource": "*"
      }
   ]
}
Using the custom role, retry creating the VPC endpoint in your AWS console or CLI.
Outbound PrivateLink connection fails
If your outbound PrivateLink connection is not working, check the following:
- Ensure that cross-zone load balancing is turned on in your Network Load Balancer (NLB).
- Ensure that the inbound rules section of the appropriate security groups permits traffic from the correct IP ranges.
- Ensure that the inbound traffic is mapped to the correct port on the endpoint service.
- In Switchboard, expand Outbound PrivateLink connections and confirm that the details appear as you expect.
- Ensure that you have allowed requests to the local network from webhooks and integrations.