Manage epics
- Tier: Premium, Ultimate
- Offering: GitLab.com, GitLab Self-Managed, GitLab Dedicated
This page collects instructions for all the things you can do with epics or in relation to them.
For information on managing child items of an epic, see child items.
Create an epic
Prerequisites:
- You must have the Planner, Reporter, Developer, Maintainer, or Owner role for the epic’s group.
To create an epic in the group you’re in:
Get to the New Epic form:
- Go to your group and from the left sidebar select Work items. Then select New item.
- From an epic in your group, in the upper-right corner, select More actions ( ). Then select New related item.
- From anywhere, in the top menu, select New ( ). Then select New work item.
- In an empty roadmap, select New work item.
From the Type dropdown list, select Epic if it is not already selected.
Complete the fields.
- Enter a title.
- Enter a description.
- To make the epic confidential, select the checkbox next to Turn on confidentiality.
- Choose labels.
- Select a start and due date, or inherit them.
- Select a color.
Select Create epic.
The newly created epic opens.
Start and due date inheritance
If you select Inherited:
- For the start date: GitLab scans all child epics and issues assigned to the epic, and sets the start date to match the earliest start date found in the child epics or the milestone assigned to the child items.
- For the due date: GitLab scans all child epics and issues assigned to the epic, and sets the due date to match the latest due date found in the child epics or the milestone assigned to the child items.
These dates are dynamic and recalculated if any of the following occur:
- A child epic’s dates change.
- Milestones are reassigned to an issue.
- A milestone’s dates change.
- Issues are added to, or removed from, the epic.
Because the epic’s dates can inherit dates from its children, the start date and due date propagate from the bottom to the top. If the start date of a child epic on the lowest level changes, that becomes the earliest possible start date for its parent epic. The parent epic’s start date then reflects this change and propagates upwards to the top epic.
Edit an epic
After you create an epic, you can edit the following details:
- Title
- Description
- Start date
- Due date
- Labels
- Milestone
- Color
Prerequisites:
- You must have the Planner, Reporter, Developer, Maintainer, or Owner role for the epic’s group.
To edit an epic’s title or description:
- Select Edit.
- Make your changes.
- Select Save changes.
To edit an epic’s start date, due date, milestone, or labels:
- Next to each section in the right sidebar, select Edit.
- Select the dates, milestone, or labels for your epic.
Reorder list items in the epic description
When you view an epic that has a list in the description, you can also reorder the list items.
Prerequisites:
- You must have the Planner, Reporter, Developer, Maintainer, or Owner role for the project, be the author of the epic, or be assigned to the epic.
- The epic’s description must have an ordered, unordered, or task list.
To reorder list items, when viewing an epic:
- Hover over the list item row to make the grip icon ( ) visible.
- Select and hold the grip icon.
- Drag the row to the new position in the list.
- Release the grip icon.
Bulk edit epics
Prerequisites:
- You must have the Planner, Reporter, Developer, Maintainer, or Owner role for the parent epic’s group.
To update multiple epics at the same time:
- In the top bar, select Search or go to and find your group.
- In the left sidebar, select Plan > Work items, then filter by Type = Epic.
- Select Bulk edit. On the right, a sidebar with editable fields appears.
- Select the checkboxes next to each epic you want to edit.
- From the sidebar, edit the available fields.
- Select Update selected.
When bulk editing epics in a group, you can edit the following attributes:
- State (open or closed)
- Assignees
- Labels
- Health status
- Notification subscription
- Confidentiality
- Milestone
- Parent
Prevent truncating descriptions with Read more
If an epic description is long, GitLab displays only part of it. To see the whole description, you must select Read more. This truncation makes it easier to find other elements on the page without scrolling through lengthy text.
To change whether descriptions are truncated:
- On an epic, in the upper-right corner, select More actions ( ).
- Toggle Truncate descriptions according to your preference.
This setting is remembered and affects all issues, tasks, epics, objectives, and key results.
Hide the right sidebar
Epic attributes are shown in a sidebar to the right of the description when space allows.
To hide the sidebar and increase space for the description:
- On an epic, in the upper-right corner, select More actions ( ).
- Select Hide sidebar.
This setting is remembered and affects all issues, tasks, epics, objectives, and key results.
To show the sidebar again:
- Repeat the previous steps and select Show sidebar.
Assignees
- Offering: GitLab.com, GitLab Self-Managed
An epic can be assigned to one or more users.
The assignees can be changed as often as needed. The idea is that the assignees are people responsible for the epic.
If a user is not a member of a group, an epic can only be assigned to them if another group member assigns them.
Change assignee on an epic
Prerequisites:
- You must have the Planner, Reporter, Developer, Maintainer, or Owner role for the group.
To change the assignee on an epic:
- In the top bar, select Search or go to and find your group.
- In the left sidebar, select Plan > Work items, then filter by Type = Epic.
- Select your epic to view it.
- In the right sidebar, in the Assignees section, select Edit.
- From the dropdown list, select the users to add as an assignee.
- Select any area outside the dropdown list.
The assignee is changed without having to refresh the page.
Epic color
- Tier: Premium, Ultimate
You can set a color for an epic to categorize and prioritize tasks visually. Use colors to:
- Associate epics with teams or company initiatives.
- Indicate levels in the epic hierarchy.
- Group related epics together.
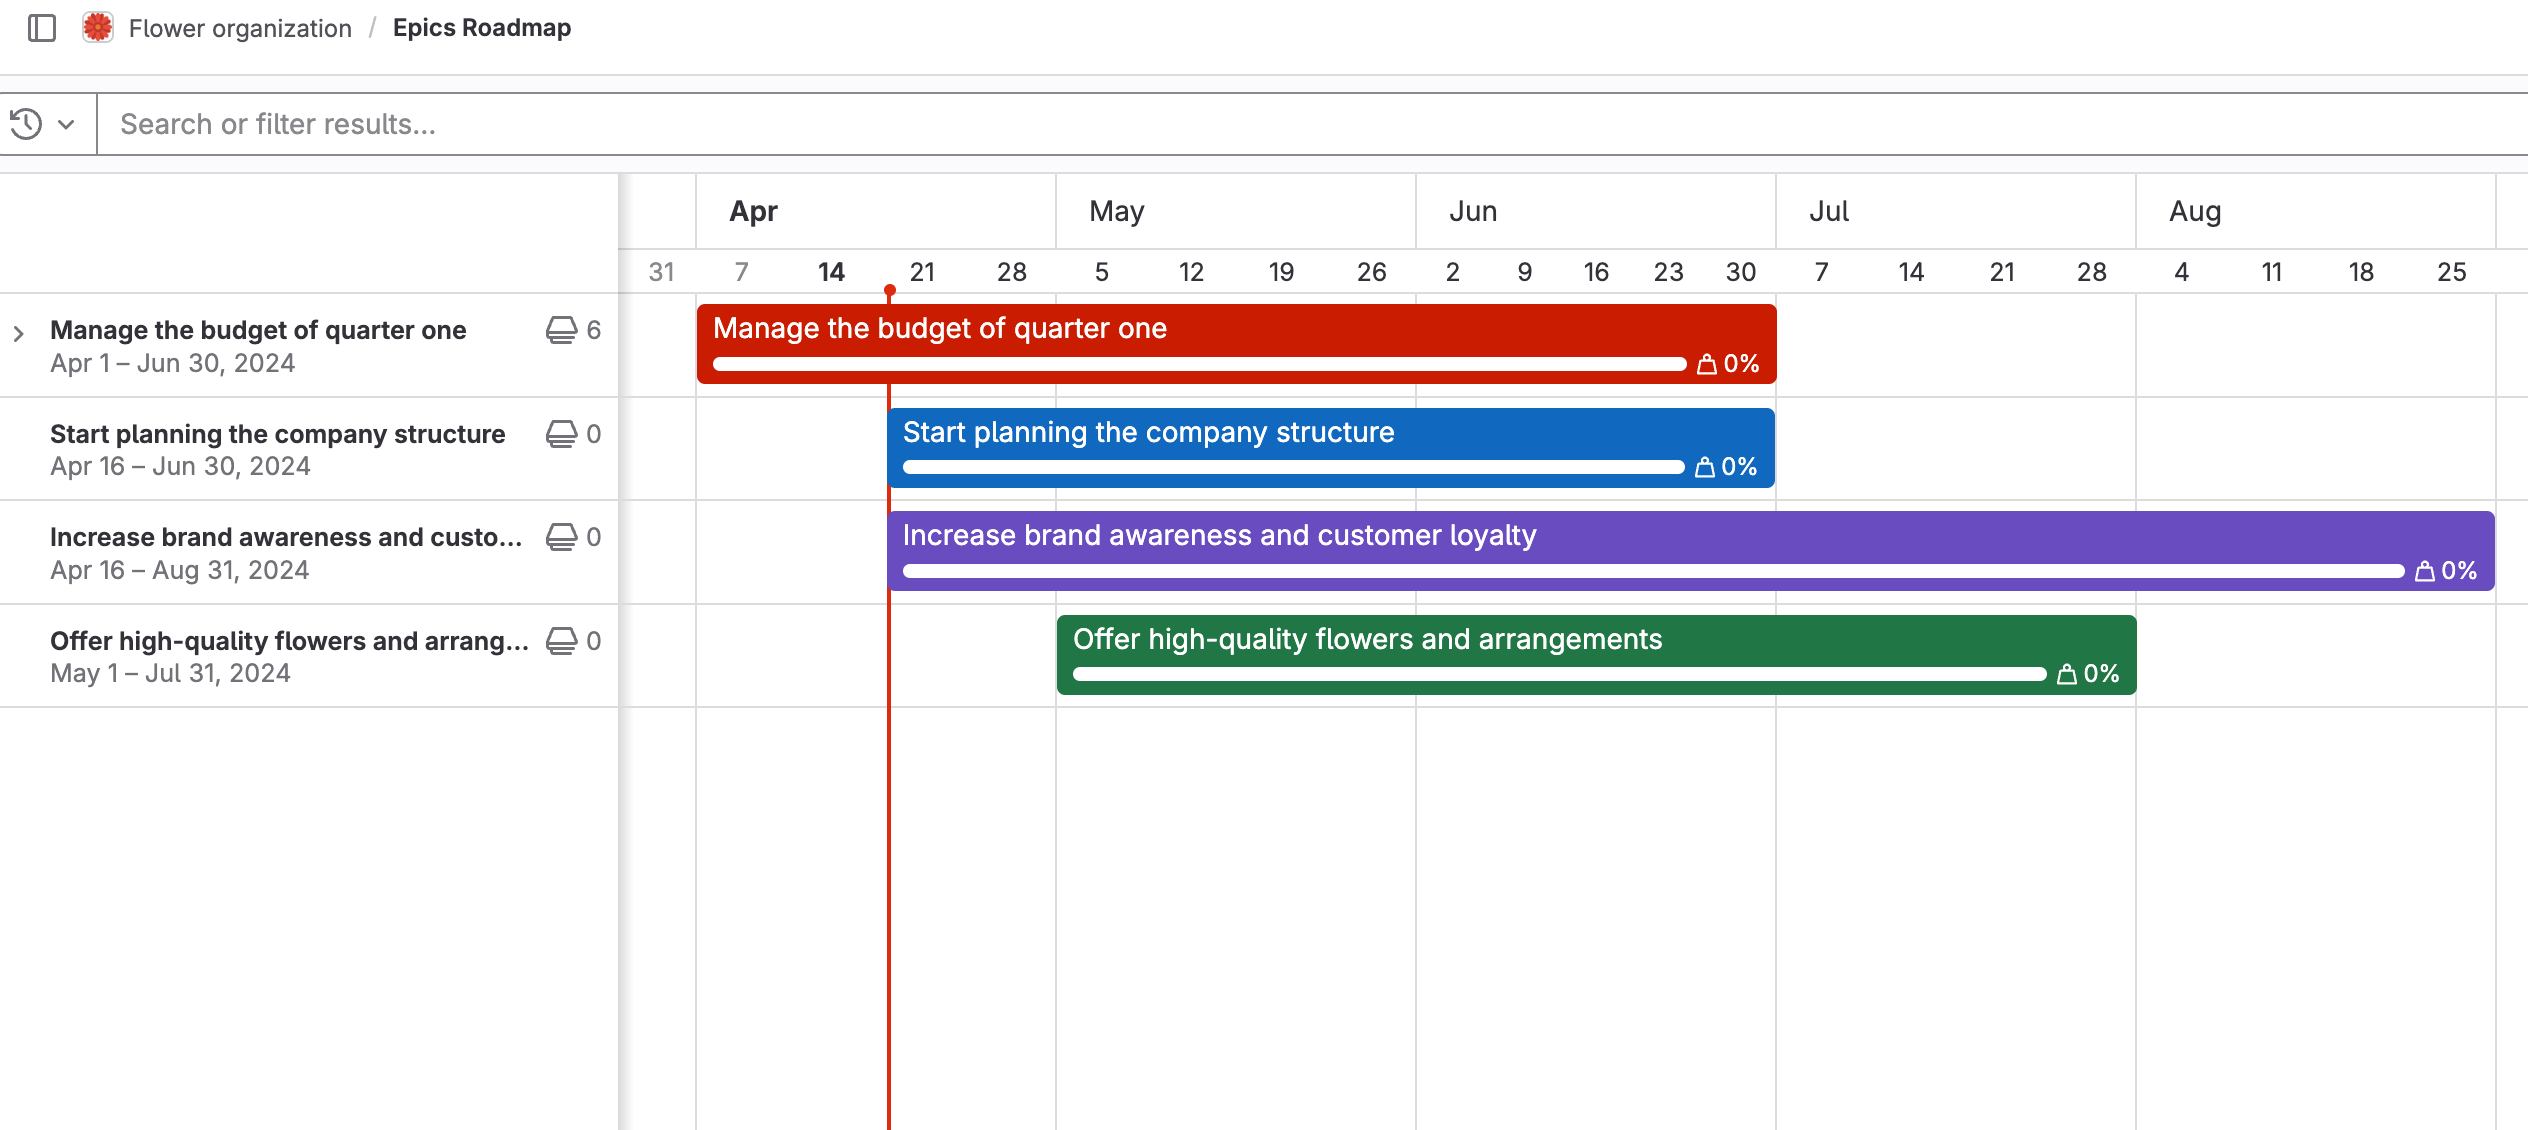
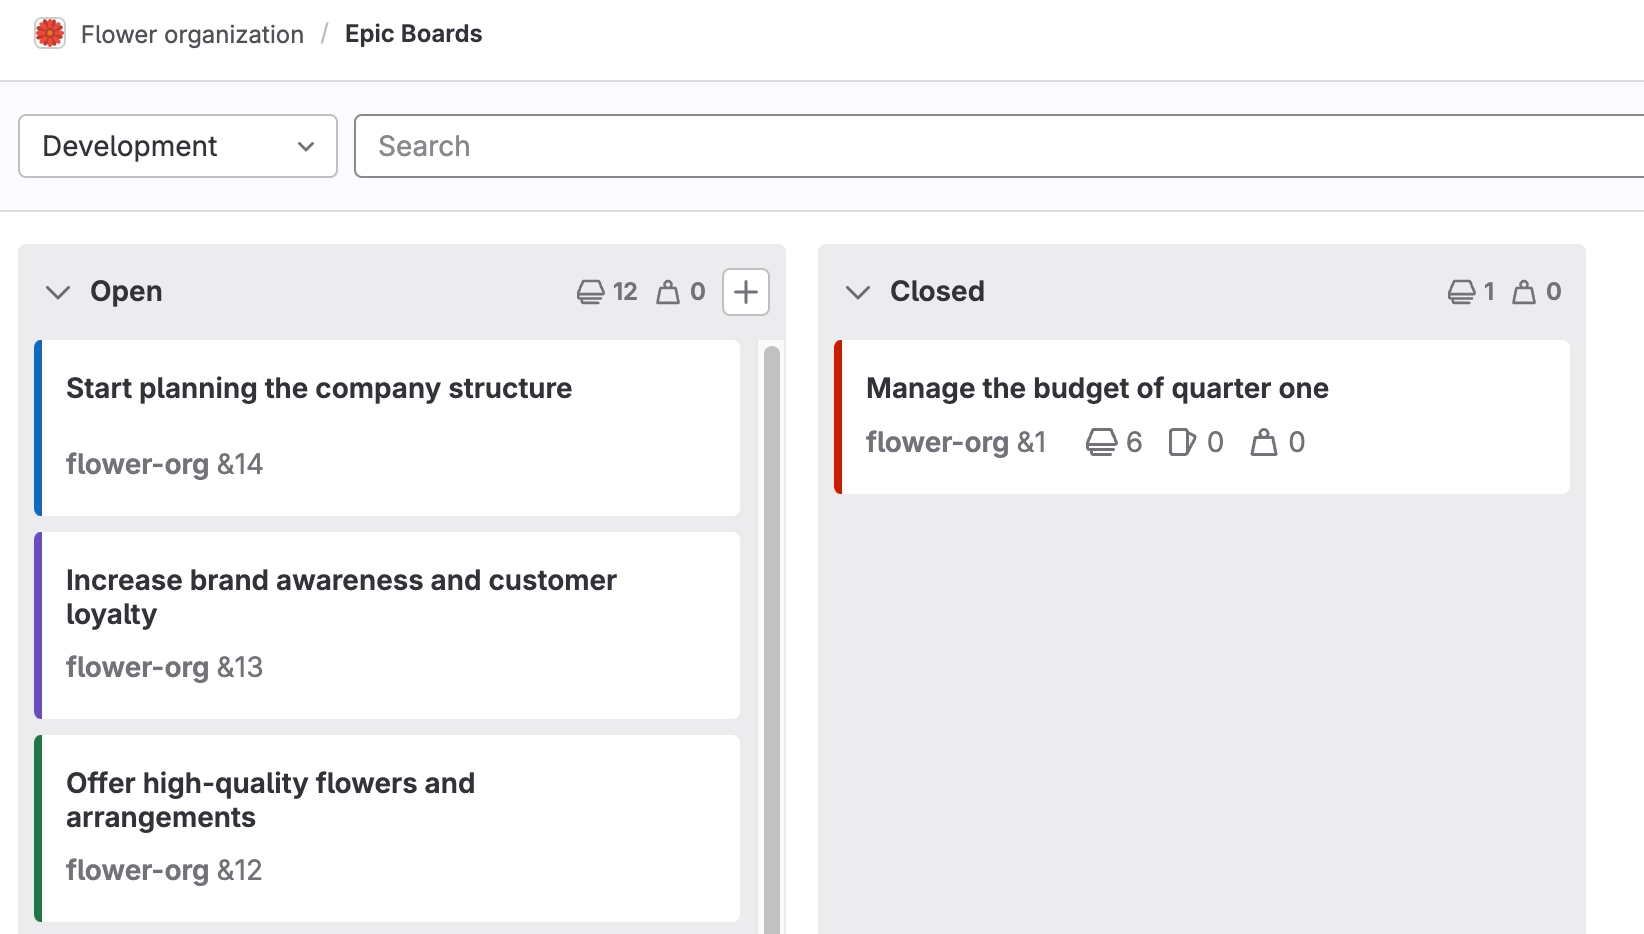
Epic colors are visible in roadmaps and epic boards.
On roadmaps, the timeline bars match the epic’s color:
On epic boards, the color shows on the epic’s card accent:
Change an epic’s color
Prerequisites:
- You must have the Planner, Reporter, Developer, Maintainer, or Owner role for the epic’s group.
To change an epic’s color:
- In the top bar, select Search or go to and find your group.
- In the left sidebar, select Plan > Work items, then filter by Type = Epic.
- Select an epic.
- In the right sidebar, in the Color section, select Edit.
- Select an existing color or enter an RGB or hex value.
- Select any area outside the dialog.
The epic’s color is updated.
Delete an epic
Prerequisites:
- You must have the Planner or Owner role for the epic’s group.
To delete an epic:
- In the upper-right corner, select More actions ( ), then Delete epic.
- Select Delete. On the confirmation dialog, select Delete epic.
Deleting an epic releases all existing issues from their associated epic in the system.
Close an epic
Prerequisites:
- You must have the Planner, Reporter, Developer, Maintainer, or Owner role for the epic’s group.
To close an epic:
- In the upper-right corner, select More actions ( ), then Close epic.
You can also use the /close quick action.
Reopen a closed epic
You can reopen an epic that was closed.
Prerequisites:
- You must have the Planner, Reporter, Developer, Maintainer, or Owner role for the epic’s group.
To do so, either:
- In the upper-right corner, select More actions ( ) and then Reopen epic.
- Use the
/reopenquick action.
You can also create an epic by promoting an issue.
Go to an epic from an issue
If an issue belongs to an epic, you can go to the parent epic from:
- Breadcrumbs at the top of the issue.
- The Parent section in the right sidebar.
View epics list
Prerequisites:
- You must be a member of either:
- The group
- A project in the group
- A project in one of the group’s subgroups
To view epics in a group:
- In the top bar, select Search or go to and find your group.
- In the left sidebar, select Plan > Work items, then filter by Type = Epic.
To set which attributes are shown for epics on the epics list, configure display preferences.
Who can view an epic
Whether you can view an epic depends on the group visibility level and the epic’s confidentiality status:
- Public group and a non-confidential epic: Anyone can view the epic.
- Private group and non-confidential epic: You must have the Guest, Planner, Reporter, Developer, Maintainer, or Owner role for the group, or be a member of a project in the group or one of its subgroups.
- Confidential epic (regardless of group visibility): You must have at least the Planner role for the group.
Open epics in a drawer
When you select an epic from the work items page or an epic board, it opens in a details panel. You can then view and edit its details without losing context of the epic list or board.
When using the drawer:
- Select an epic from the list to open it in the drawer.
- The drawer appears on the right side of the screen.
- You can edit the epic directly in the drawer.
- To close the drawer, select the close icon ( ) or press Escape.
Open an epic in full page view
To open an epic in the full page view:
- Open the epic in a new tab. From the list of work items, either:
- Right-click the epic and open it in a new browser tab.
- Hold Command or Control and select the epic.
- Select an epic, and from the drawer, either:
- In the upper-left corner, select the issue reference, for example
my_project#123. - In the upper-right corner, select Open in full page ( ).
- In the upper-left corner, select the issue reference, for example
To always open work items in full page view, see set preference whether to open items in a drawer.
Filter a list of epics
You can filter a list of epics by:
- Title or description (select Search within)
- Author name / username
- Confidentiality
- Groups
- Health
- Labels
- Milestones
- Reaction emoji
- Parent
- Subscribed
- Custom fields enabled for epics
To filter:
- In the top bar, select Search or go to and find your group.
- In the left sidebar, select Plan > Work items, then filter by Type = Epic.
- Select additional filters, operators, and values as needed. To search by title or description, type in the filter bar.
- Press Enter or select the magnifying glass ( ).
Filter with the OR operator
You can use the OR operator (is one of: ||) when you filter the list of epics by:
- Assignee
- Author
- Label
is one of represents an inclusive OR. For example, if you filter by Label is one of Deliverable and
Label is one of UX, GitLab shows epics with either Deliverable, UX, or both labels.
Sort the list of epics
You can sort the epics list by:
- Created date
- Updated date
- Closed date
- Milestone due date
- Due date
- Popularity
- Title
- Start date
- Health
- Blocking
Each option contains a button that can toggle the order between Ascending and Descending. The sort option and order is saved and used wherever you browse epics, including the roadmap.
Change activity sort order
You can reverse the default order and interact with the activity feed sorted by most recent items at the top. Your preference is saved in local storage and automatically applied to every epic and issue you view.
To change the activity sort order, select the Oldest first dropdown list and select either oldest or newest items to be shown first.
Make an epic confidential
If you’re working on items that contain private information, you can make an epic confidential.
A confidential epic can only contain confidential issues and confidential child epics. However, merge requests are public, if created in a public project. To create a confidential merge request, see merge requests for confidential issues.
Prerequisites:
- You must have the Planner, Reporter, Developer, Maintainer, or Owner role for the epic’s group.
To make an epic confidential:
- When creating an epic: Select the checkbox next to Turn on confidentiality.
- In an existing epic: In the upper-right corner, select More actions ( ). Then select Turn on confidentiality.
You can also use the /confidential quick action.
Manage issues assigned to an epic
This section collects instructions for all the things you can do with issues in relation to epics.
Health status
- Tier: Ultimate
Use health status on epics to gain quick insight into project progress. Health status helps you communicate and manage potential issues proactively.
You can view an epic’s health status in the epic view and in the Child items and Linked items sections.
You can set the health status to:
- On track (green)
- Needs attention (amber)
- At risk (red)
To address risks to timely delivery of your planned work, incorporate a review of epic health status into your:
- Daily stand-up meetings
- Project status reports
- Weekly meetings
Change health status of an epic
Prerequisites:
- You must have the Planner, Reporter, Developer, Maintainer, or Owner role for the group.
To change the health status of an epic:
- In the top bar, select Search or go to and find your group.
- In the left sidebar, select Plan > Work items, then filter by Type = Epic.
- Select an epic.
- In the right sidebar, in the Health status section, select Edit.
- From the dropdown list, select a status.
The epic’s health status is updated.
You can also set and clear health statuses using the /health_status and /clear_health_status quick actions.
Participants
Participants are users who interacted with an epic. For information about viewing participants, see participants.